Featured post

How to set a profile for your Blogger account

Friday, 23 March 2018

How To Change Gmail Password On PC


Hello Friend.Welcome to my Tech4 Support Site and in this Tutorial, I will Show You How to Change Gmail Password on Computer With Pictures.


Some Time We Want to Change Gmail Account Password then this post helps You to change Gmail Password.


Thre is a Some Step to Follow.


Step 1: First of all Open Gmail and then click Setting Icon and click the Setting Option.

Step 2: Now we click the Account and Import Tab and Click the Change Password Link.

Step 3: Now We Type Old Password Og Gmail Account

Step 4: Here is Now We Type the New Password and Click Change Password Blue Button.


Read More:- How to Delete Gmail Account Permanently
Read More:- How To Delete Hard Disk Partition In Windows 10

                      I hope you enjoy this Post. If any problem comments it.

                                Daily Tech Update Check and Join Us:                                                                                                                                                                                                                  Facebook | Twitter | Google+ | Tumblr | Instagram | YouTube


Sunday, 18 March 2018

How to Delete Gmail Account Permanently


Hello Friends.Welcome to My Tech 4 Support Site and Gmail Tutorial, I Will Show You how to Delete Gmail Account Permanently With Picture.


If We Need to delete/remove Gmail Account Permanently then This post helps to remove Gmail Account.


Follow the Step:-


Step 1: First we need to Open the browser and select Gmail account Click the circle Icon then click My Account  Blue Button.

Step 2: Then Click Delete Your Account Service Link.

Step 3: After That Delete Google Account And Data Link.

Step 4: Then type the Password and Click Sign in.

Step 5: Now Check the box then click Delete Account button.


                   I hope you enjoy this Post. If any problem comments it.

                                Daily Tech Update Check and Join Us:                                                                                                               Facebook | Twitter | Google+ | Tumblr | Instagram | YouTube

Saturday, 17 March 2018

How To Delete Hard Disk Partition In Windows 10


Hello Friends, Welcome To My Blog Tech 4 Support Today I Will Show You how to remove/Delete Hard Disk Partition In Windows 10 Guide With Picture.


sometimes we have a lot of hard disk partition in PC and when we Restore our computer or laptop and we install new windows OS then we need to delete some these partition.


There is some Step to follow.


Step 1: first of all Right click on PC Then Select the Manager Option.


Step  2: Now Click any Partition Press Right-click on Unwanted  HD Partition.


Step 3: Click on the Delete Volume...Option


Step 4: Now Click Yes Button.


             Read More:- How to Startup Make Faster On Windows 10
             Read More:- Disconnect Other User From WiFi Router                                          Using Android


                  I hope you enjoy this Post. If any problem comments it.

                              Daily Tech Update Check and Join Us:                                                                    Facebook | Twitter | Google+ | Tumblr | Instagram | YouTube

Wednesday, 14 March 2018

How to Startup Make Faster On Windows 10


Hello Friends, Welcome to My Blog Tech 4 Support and I Will Show you how to Startup Make Faster On Windows 10With Pictures or Faster Windows Startup.


Sometimes When we open or switch on our Windows Computer or Laptop then lots of Software or Programs are also opening at the same time in Background. This process can make slow our Windows startup, so we going to fix it.


Follow the Step:-


Step 1: First of all we right click on the Toolbar and Click the Task Manager Option.


Step 2: After that Now Click on the More Detail Option.


Step 3: Now We see the Startup Tab we disable all status.


                  I hope you enjoy this Post. If any problem comments it.

 Daily Tech Update Check and Join Us: Facebook Twitter | Google+ Tumblr | Instagram | YouTube


Tuesday, 13 March 2018

How to Disconnect Other User From WiFi Router Using Android


Hello Friends, Welcome to My Blog Tech 4 Support and I Will Show you how to Disconnect Wifi From wifi Router Using Smartphone.For this, We will Use app call arcai Netcut Disconnect or remove connected wifi from Router.


Follow the step.


Step 1: First of all we install an app and open.

Step 2: Then we see the list of wifi with IP and Name.


Step 3: And then Click any wifi to cut/remove or Disconnect the User.


                        Here is a link to Download for Android

Note: This app is only working to Rooted Mobile.If Your Mobile is not rooted then root first your Mobile.


                    I hope you enjoy this Post. If any problem comments it.

 Daily Tech Update Check and Join Us: Facebook Twitter | Google+ Tumblr | Instagram | YouTube


Monday, 12 March 2018

How to See/View Wifi Pasword in Smartphone


Hello Friends, Welcome to Tech 4 Support Blog and I will Show You how to view/see Wifi Password on Smartphone.Some time we Sharing own Wifi but we don't remember Password then we use WiFiPwd Viewer app on the android phone to view my all Wifi passwords.


Follow the Some Step to View.


Step 1: First of all we will install the app and open it.


Step 2: in the wifi list click any wifi then Share and Copy Name pwd ETC.


                   Click Here For Apk File Download

Note: This App is Work Only Rooted Mobile.

Sunday, 11 March 2018

How to Access Android SD Card From wifi


Hello Friend.Welcome to a Tech 4 Support Blog today I will show you how to access Phone Sd card from Wifi Network With pictures Or Access smartphone from pc.


We want to share some file or data from the smartphone to PC, then we do not need any Software or On the go cable to connect Smartphone to PC.In this method, we teach you how to connect PC to Phone.


There are some methods to Follow.


Step 1: First of all we will install ES File Explorer on Phone then Open the View on PC Option on Home Screen.


Step 2: Click on the turn on button.
Step 3: After that, we remember this IP Adress.
Step 4: Go to Windows Computer and Open This PC then Type the IP ADDRESS in Path Bar (address bar).


                   I hope you enjoy this Post. If any problem comments it.
 Daily Tech Update Check and Join Us :Facebook Twitter | Google+ Tumblr | Instagram | YouTube


Wednesday, 7 March 2018

404 Error Pages Custom and Stylish For Blogger/Wordpress


Page not Found or Page 404 Error appear when a user or blogger enters an invalid URL or 404 Error is an HTTP status code that means the page you are trying to reach on your Blog couldn’t found or Page not exists in the Server.
In the Normal default setting only show page message in a box and it does not look Stylish.
At that way, I am going to Show you how to Customize it much better…


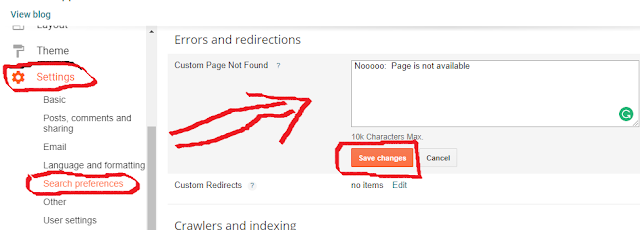
Only Custom message [No Style]


Only Show a custom message then First Go to updated Blogger Interface
Then Go to Setting->Search Preferences


Error Message with Stylish 404 images


You want to Colorful Stylish  404 page do the following the Step.
  • Go to Design->Edit HTML
  • Find </head> and copy the below code just above it.
<b:if cond='data:blog.pageType == "error_page"'>
<style type="text/css">.status-msg-wrap{font-size:100%;margin:none;position:static;width:100%}.status-msg-border{display:none}.status-msg-body{padding:none;position:static;text-align:inherit;width:100%;z-index:auto}.status-msg-wrap a{padding:none;text-decoration:inherit}</style>
</b:if>
  • Save the Template 

Error Page Style 1


  •  Go to Setting->Search Preferences
  • Copy below code in Custom Page Not Found section [as shown in fig. first]
<h2 style="font-size: 35px;margin: 0;text-align: center;">Oops..! </h2>
<h3 style="font-size:17px;">Sorry,You are trying to reach an invalid page...!<br><a href="/">Click here</a> to go to Homepage <br> Have a nice Day...</h3><img src="https://blogger.googleusercontent.com/img/b/R29vZ2xl/AVvXsEjUwaqo1zEwFuoyXQmNs1nLWLtcrqpPlsuiRjugXt-Ge__Nz51sQeP4LkffFHCK5-faRd_bZD3oL556gh27gfWyWOHPdb2kpduWg1BWA_ECxgiX-WGWUugK3eA-i8N4H4euQBzvuijOOHY/s1600/404+error+page+1.jpg"/>

Error Page Style 2

  • Go to Setting->Search Preferences
  • Copy below code in Custom Page Not Found section [as shown in fig. first]
<h2 style="font-size: 35px;margin: 0;text-align: center;">Oops..! </h2>
<h3 style="font-size:17px;">Sorry,You are trying to reach an invalid page...!<br><a href="/">Click here</a> to go to Homepage <br> Have a nice Day...</h3><img src="https://blogger.googleusercontent.com/img/b/R29vZ2xl/AVvXsEgrsIz7R9uQC7VXVz3uc3kMD015hp5uWyrcD0bYA08Zk428oZABBZXIlHTRVKezgiYp02W3KOwxpFZHrfnZdeU7pTxF-PnCVDfWVJOaN1QXZp68dJvemsYAUG-l5WtUurg-DWb8Pl7vKdc/s1600/404+error+page+2.jpg"/>

Error Page Style 3

  • Go to Setting->Search Preferences
  • Copy below code in Custom Page Not Found section [as shown in fig. first]
<h2 style="font-size: 35px;margin: 0;text-align: center;">Oops..! </h2>
<h3 style="font-size:17px;">Sorry,You are trying to reach an invalid page...!<br><a href="/">Click here</a> to go to Homepage <br> Have a nice Day...</h3><img src="https://blogger.googleusercontent.com/img/b/R29vZ2xl/AVvXsEj3pQwI-lecT1ZNlS6esOATBfPm0L8VVx_qAMMkeorAemuTSGAavHNnjORsKUlg05tDhkfGUzMPPxqMyYObgv2iWxWITncb98_9NHGnaU2gd1P_YOMAyqHG8pBXbcwElJ8i7TpKh73gqe4/s1600/404+error+page+4.jpg"/>

Error Page Style 4

  • Go to Setting->Search Preferences
  • Copy below code in Custom Page Not Found section [as shown in fig. first]
<h2 style="font-size: 35px;margin: 0;text-align: center;">Oops..! </h2>
<h3 style="font-size:17px;">Sorry,You are trying to reach an invalid page...!<br><a href="/">Click here</a> to go to Homepage <br> Have a nice Day...</h3><img src="https://blogger.googleusercontent.com/img/b/R29vZ2xl/AVvXsEhUqxkQm_3CYV7kJIenzy4k88-YzvkJnqwT8CBGRaun4J0FATyTJj0jg0Y3ssZcIqqiQsyKGZxCrRUpo45VmYj78RxEhW2edKCQNL4LLbWhUCH1PDn_EQta4aztnEGp1O1fmBtfYIwl6Yw/s320/404+error+page+6.jpg"/>

Error Page Style 5

  • Go to Setting->Search Preferences
  • Copy below code in Custom Page Not Found section [as shown in fig. first]
<h2 style="font-size: 35px;margin: 0;text-align: center;">Oops..! </h2>
<h3 style="font-size:17px;">Sorry,You are trying to reach an invalid page...!<br><a href="/">Click here</a> to go to Homepage <br> Have a nice Day...</h3><img src="https://blogger.googleusercontent.com/img/b/R29vZ2xl/AVvXsEgVQA_k7RbH_ND8UhQPderN9yByzBLb5XQdSZXvYYYuHX0-mWymhMooJIbM_HzQixMhihU35DnhXah0KdTjUKQtD3-QpWMtoEQTG9jBL0V0rrl2mRhQc7pweBsVWBIrOx8s9hgYu4CY9d8/s1600/404+error+page+7.jpg"/>

Error Page Style 6

  • Go to Setting->Search Preferences
  • Copy below code in Custom Page Not Found section [as shown in fig. first]
<h2 style="font-size: 35px;margin: 0;text-align: center;">Oops..! </h2>
<h3 style="font-size:17px;">Sorry,You are trying to reach an invalid page...!<br><a href="/">Click here</a> to go to Homepage <br> Have a nice Day...</h3><img src="https://blogger.googleusercontent.com/img/b/R29vZ2xl/AVvXsEgCYfhL1XHL36l7cKYNtVjmKHzUfU6ve8AHLbU4v0hYxtRtcl03ioGyo4rTJKBQM_57PCedAyp7sl1LpF-SLXss9ozfLWQZ2O1bk8vISFszgaPx-KySTkr5qBbZB4bid4rTko60enonBAs/s1600/404+error+page+3.jpg"/>
Then Click Save.That all.
Most thanks to Page Called custom error page code, visit here. Then I made some changes and add beautiful 404 images that I was inspired by 
Dian.


I think this article helped you..If any bugs of doubts don’t hesitate to ask..do comment…
Like and share…


                   I hope you enjoy this Post. If any problem comments it.

                                         Daily Tech Update Check